If you’ve ever wished you could multiply your favorite rose bushes without spending a dime, here’s your chance. Growing roses from cuttings is easier than it looks — and it’s one of the most rewarding ways to expand your garden. With a little care, patience, and the right technique, you can turn a single rose stem into a brand-new plant.
Why Grow Roses from Cuttings?
Starting roses from cuttings has several advantages:
- It’s cost-effective. You don’t need to buy new plants every year.
- You can preserve a favorite variety. Especially if the original bush is aging or rare.
- It’s a great way to share plants. Give rooted cuttings as thoughtful gifts to family or friends.
- It’s satisfying. Watching roots form and new growth emerge is a gardener’s joy.
When to Take Rose Cuttings
The best time to take cuttings depends on your climate, but generally:
- Late spring to early summer is ideal. New stems are firm but not fully woody.
- Late fall to winter can also work with hardwood cuttings, which are more mature but slower to root.
Avoid taking cuttings when the plant is flowering heavily or when stems are too soft and green.
Choosing the Right Stem
Look for a healthy stem from a strong, disease-free rose plant. Choose one that:
- Is about the thickness of a pencil
- Has at least three leaf nodes (the little bumps where leaves or buds grow)
- Has finished flowering or is between bloom cycles
Avoid old, woody branches or very young, floppy growth — they’re harder to root successfully.
What You’ll Need
Gather your materials before you start:
- Clean, sharp pruning shears
- Rooting hormone (optional but helpful)
- Small pots or containers with good drainage
- A well-draining mix (equal parts potting soil and perlite or sand)
- Clear plastic bags or a humidity dome
- A spray bottle with clean water
- Plant labels (if you’re rooting more than one variety)
Step-by-Step: How to Root Rose Cuttings
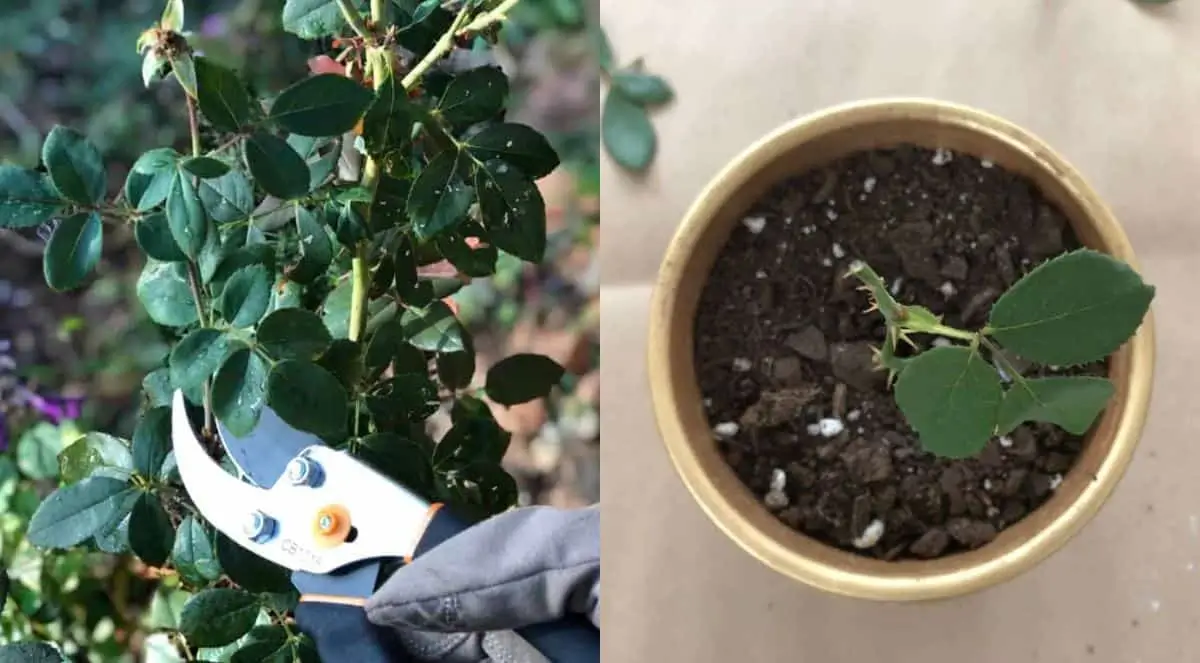
Step 1: Take the Cutting
Cut a stem about 6 to 8 inches long, just below a leaf node.
Remove any flowers, buds, and most of the leaves, keeping only one or two small leaves at the top.
Step 2: Prepare the Base
Dip the bottom end of the cutting into rooting hormone if you have it.
This encourages faster and stronger root growth but isn’t absolutely required.
Step 3: Plant the Cutting
Fill your pot with moistened soil mix.
Insert the cutting into the soil so that at least one or two leaf nodes are below the surface.
Firm the soil gently around the stem to hold it steady.
Step 4: Create a Humid Environment
Cover the pot with a clear plastic bag or dome to trap humidity.
Make sure the plastic doesn’t touch the cutting — use small sticks to keep it raised if needed.
Open the cover occasionally to let in fresh air and prevent mold.
Step 5: Place in the Right Spot
Keep the pot in bright, indirect light — never direct sunlight.
Maintain a temperature around 65–75°F (18–24°C).
Mist lightly every few days to keep the soil and air moist.
Caring for the Cutting While It Roots
Over the next few weeks, check regularly:
- The soil should stay slightly damp, never soggy.
- Remove any leaves that turn brown or moldy.
- Don’t tug on the cutting — you can test for roots by gently pulling after 4–6 weeks. If you feel resistance, roots have formed.
Most rose cuttings root within 4 to 8 weeks, depending on the variety and environment.
Transplanting Your Rooted Rose
Once the cutting has developed several healthy white roots, it’s time to transplant.
- Gently lift the cutting and place it into a larger pot with rich, well-draining soil.
- Water thoroughly and keep it in partial shade for a few days to help it adjust.
- After a week or two, you can move it to its permanent spot in the garden.
If planting outdoors, make sure the soil is loose and drains well. Avoid planting during extreme heat or frost.
Common Problems and How to Fix Them
| Problem | What’s Happening | How to Fix It |
|---|---|---|
| Cutting turns black or mushy | Overwatering or poor drainage | Let the soil dry slightly and improve airflow |
| Leaves wilt quickly | Low humidity or too much sun | Move to indirect light and mist regularly |
| No roots after several weeks | Temperature too cold or no hormone used | Try again with fresh cuttings in warmer conditions |
| Mold on soil or stem | Excess moisture, no ventilation | Remove mold, air out the covering daily |
Helpful Tips for Better Success
- Take several cuttings — not all will root successfully.
- Label each cutting with the variety name and date.
- Use sterilized tools and clean pots to prevent disease.
- Avoid fertilizing until roots have formed.
- Be patient — roses are slow to start but rewarding in the end.
Final Thoughts
Growing roses from cuttings is one of the most enjoyable ways to fill your garden with color and fragrance. It doesn’t require expensive tools or deep expertise — just time, consistency, and a bit of curiosity.
Start with one healthy stem, follow these steps carefully, and you’ll soon be rewarded with a brand-new rose plant that’s uniquely yours.
Ready to begin? Choose your favorite rose, snip a cutting, and start growing your next beautiful bloom today!